
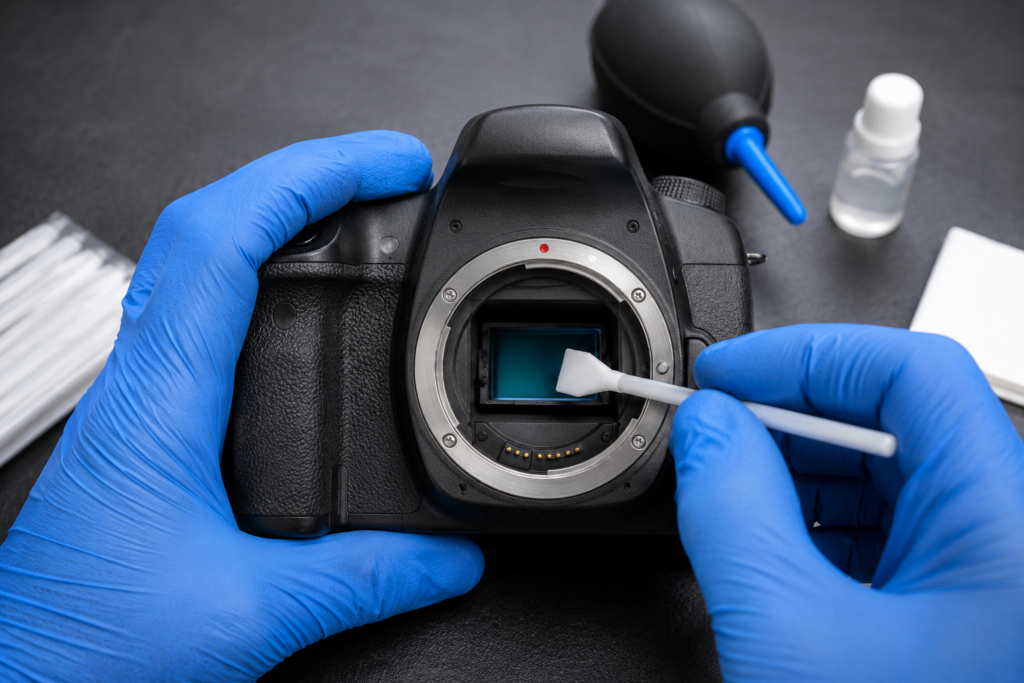
That one dark speck on a bright sky can ruin your mood fast, and I’ve been there. How to clean DSLR camera sensor safely is simple if you go slow and start gentle. Start with a blower first, then use a camera sensor cleaning kit for wet sensor cleaning only if the spots stay and you still need to clean DSLR sensor marks. If you’re new, read What Does DSLR Camera Stand For? and then follow the steps below to get clean photos again.
How Do You Know If Your DSLR Camera Sensor Is Dirty?
A dirty sensor usually shows up as the same little spots in the same place in every photo. I first noticed it on a blue sky shot and thought my lens was ruined. The short answer: if the spots stay put after you clean the lens, it’s likely sensor dust. This check saves you from doing camera sensor cleaning when you don’t need it.
Common Signs of a Dirty Camera Sensor

The most common sign is small, dark dots that keep popping up in your images. They often look faint at first, then scream at you when you edit. The short answer: sensor dust is easiest to see on bright, plain backgrounds. Here’s what to look for:
- Tiny dark spots or smudges in photos
- Spots that appear in the same location across many shots
- Dust that gets worse at f/11, f/16, or f/22
- Spots that stand out on blue skies, white walls, or smooth backdrops
Sensor Dust vs. Lens Dirt What’s the Difference?

Lens dirt moves; sensor dust stays in the same place. I wiped a front lens element, felt proud, took another photo… and the spot laughed at me from the exact same corner. The short answer: if the mark does not move after cleaning the lens (and even after changing lenses), it’s probably on the sensor. That’s why “how to clean DSLR sensor” guides always start with a test first.
Also, if you swap lenses and the spot is still in the same spot, that’s a big clue. A dirty lens can change the look of contrast or flare, but it usually won’t make a fixed dot that repeats perfectly. The short answer: a repeated dot in the same spot is a sensor issue, not a lens issue. If you want help dialing in test settings, see DSLR camera settings for beginners.
Take a Test Photo Before Cleaning
The best way to confirm sensor dust is a quick “dust test” photo. I do this anytime I’m about to travel, because it tells me if I need a camera sensor cleaning kit or just a blower.
- Point your camera at a plain white wall or a clear blue sky.
- Set a narrow aperture like f/16 to f/22.
- Defocus the lens a little (so texture in the wall/sky doesn’t distract you).
- Take the photo and zoom in to 100% on your screen.
- Note where the spots are (top left, center, etc.).
- Save the image so you can compare it after cleaning.
If you see spots in the same place at 100%, your sensor is the likely cause. The short answer: this “before” photo becomes your proof that cleaning worked. Now you can move on with confidence starting with the safest, least invasive step.
What Causes Dust and Dirt on a DSLR Camera Sensor?
Dust gets on your sensor for one simple reason: the camera has to “breathe” when you use it. The short answer: every time the lens mount is open, tiny bits in the air can slip inside. And once a speck lands there, it can show up in photos like a tiny freckle you can’t unsee. Think of the sensor area like a clean table in a busy room, leave it uncovered, and something will land on it.
Frequent Lens Changes

Changing lenses a lot is the most common way dust gets in. The short answer: more lens swaps usually means more chances for dust to enter the camera. I’ve done quick swaps at events and later found the same little dot in every sky shot. It’s not “bad camera care” it’s just normal use.
Changing Lenses Outdoors

Outdoor lens changes are dust’s favorite time to sneak in. The short answer: wind and open air can blow grit straight into the camera body. Even on a calm day, you’re dealing with pollen, sand, and tiny fibers in the air. If you’ve ever changed a lens at a beach or on a trail, you know how fast nature can humble you.
Dusty and Windy Environments
Dusty places make sensor spots show up faster. The short answer: shooting in wind, dirt, or dry air increases sensor dust a lot. Places like deserts, construction areas, and busy streets can kick up fine dust you barely see. And that fine dust is the kind that loves to stick.
Zoom Lens Movement

Zoom lenses can pull air in and push air out as you zoom. The short answer: zooming can move air through the camera and stir up dust. It’s not that zoom lenses are “bad” it’s just physics doing its thing. If there’s dust around the mount area, airflow can help it travel.
Static Electricity and Fine Dust

Static can make your sensor area act a bit like a dust magnet. The short answer: static electricity can attract very fine dust to the sensor surface. This is why sometimes you clean once, and a tiny speck seems to “cling” anyway. It’s also why gentle methods matter when you start camera sensor cleaning.
Oil and Moisture Contamination
Not all marks are dry dust, some are oily or damp spots. The short answer: oil and moisture can leave smears that a blower will not remove. Oil can come from inside the camera over time, and moisture can come from humid air or sudden temp changes. These are the cases where you may later need wet cleaning, but only after you confirm the issue with a test shot.
Why Small Apertures Make Sensor Dust More Visible
Dust is easiest to see when you shoot at small apertures like f/11, f/16, or f/22. The short answer: a narrow aperture makes dust shadows sharper, so spots pop out more. At wide apertures (like f/1.8 or f/2.8), those shadows blur and hide. That’s why people often “discover” dust while shooting skies, landscapes, or bright walls right when detail is crisp and the background is smooth.
What You Need for DSLR Camera Sensor Cleaning
You don’t need a fancy lab to do camera sensor cleaning, but you do need the right basics. Quick answer: the safest setup is a clean room, a fully charged battery, and a blower before you try anything wet. I learned this the hard way after trying to “make do” with random clothes and regret. Keep it simple, and you’ll feel calm the whole time.
Essential Camera Sensor Cleaning Tools

Think of this like making tea: you want the right cup, clean water, and no shortcuts. Quick answer: a blower + the correct swabs are the core tools, and everything else is support. If you buy only one thing first, make it a manual air blower (often called a rocket blower). Here’s what I keep in my own bag:
- Manual air blower (rocket blower): for loose dust (your first move)
- Sensor cleaning swabs: the right width for your sensor (APS-C or full-frame)
- Sensor-safe cleaning fluid: for wet sensor cleaning when dust won’t budge
- Sensor brush (optional): only if it’s made for sensors and kept very clean
- Clean microfiber cloth: for the outside of the camera body and lens mount area
- Fully charged battery: so the camera doesn’t shut off mid-clean
- Clean workspace: a table indoors, no fans, no open windows
- Sensor loupe/light (optional): helps you see dust before and after
- Body cap / rear lens cap: so the inside stays covered when you pause
How to Choose a Camera Sensor Cleaning Kit
A good camera sensor cleaning kit should match your camera, not just “fit most.” Quick answer: swab size matters more than brand because the swab must cover the sensor in a clean pass. If the swab is too small, you’ll do extra wipes and raise the risk of streaks. If it’s too big, it can snag or smear along the edges.
Start by choosing the correct sensor size. Quick answer: APS-C swabs are smaller than full-frame swabs, and using the wrong one is a common reason people get streaks. Many popular cameras use APS-C (for example, the a6400 Sony is APS-C, even though it’s mirrorless, not a DSLR). Always check your camera’s sensor type before you click “buy.”
Next, decide if you need dry-only tools or wet-clean tools too. Quick answer: dry cleaning is for light dust, while wet sensor cleaning is for stuck spots or oily marks. A “dry kit” often means a blower and maybe a brush. A “wet kit” usually means swabs plus fluid, and that’s what removes smears that air can’t.
Finally, look for swabs that are sealed and single-use. Quick answer: single-use swabs help prevent scratches from trapped grit. I also like kits that clearly say “sensor safe” and list what the fluid is meant for. If you’re still building your setup (or even choosing your first body), you can also check the best dslr camera for beginners for gear ideas.
What You Should Never Use on a Camera Sensor
This part is where people panic and make things worse, so let’s keep it clear. Quick answer: if it isn’t made for sensors, don’t let it touch your sensor. The sensor area has delicate layers, and the wrong tool can leave marks fast. When in doubt, stop and switch to a proper sensor tool.
Here’s the “do not use” list I wish someone had handed me early on. Quick answer: these items can spray residue, shed fibers, or scratch:
- Canned/compressed air: too strong, can spit bitter liquid propellant
- Household glass cleaner: can leave residue and harm coatings
- General-purpose alcohol: not the same as sensor fluid, can streak
- Tissue or paper towel: rough fibers can scratch
- Cotton buds/swabs: shed lint and can drag grit
- Your fingers: skin oils smear and are hard to remove
- Your breath: moisture + tiny spit drops = more spots, not fewer
If you stick to the right tools, cleaning stops feeling scary and starts feeling normal like swapping a lens cap. Quick answer: the right kit lowers risk more than “being brave” ever will.
How to Clean DSLR Camera Sensor Step by Step
If you’re nervous, that’s normal. I was too. Short answer: the safest way to do camera sensor cleaning is to start dry (blower), then stop if the spots are gone. Think of it like brushing dust off a record before you ever reach for liquid cleaner. Slow and gentle wins here.
Step 1: Prepare a Clean Workspace

Pick a clean, calm spot indoors, like a table in a room with the windows closed. Short answer: less airflow means less new dust landing on your sensor while you work. Turn off fans, AC blasts, and anything that stirs the air. I also wipe the outside of the camera body first, so loose grit doesn’t fall inside later.
Step 2: Fully Charge the DSLR Battery

Charge your battery to full before you start. Short answer: you do not want the camera to shut off while the mirror is up. On many DSLRs, the “manual cleaning” mode lifts the mirror and opens the shutter, and power loss can cause a sudden close. If you’re curious how this differs by camera type, see dslr vs mirrorless battery life.
Step 3: Remove the Lens Carefully

Remove the lens with the camera turned off if your brand suggests it (many do). Short answer: keep the camera mount facing down so dust falls out, not in. Try not to leave the camera open longer than needed. I like to have the body cap ready, like a lid you can pop on fast.
Step 4: Activate the Camera’s Sensor Cleaning / Manual Cleaning Mode
Go into your camera menu and find sensor cleaning or manual cleaning. Short answer: this mode safely raises the mirror on a DSLR so you can access the sensor area. Never force the mirror with your finger, even if you think it’s just a little. Let the camera do the moving.
Step 5: Use a Manual Air Blower First

Use a rocket blower with the camera mount pointing down. Short answer: a few short bursts can remove loose dust without touching anything. Keep the blower tip outside the mount don’t poke it inside, and never let it touch the sensor. And please skip canned air: it can blast too hard and may spit liquid.
Step 6: Inspect the Sensor Again
Put the lens back on and take the same dust-test photo you took before. Short answer: if the spots are gone, you’re done, stop right there. Compare at 100% zoom and check the same areas you marked earlier. If you still see spots in the same place, that’s when you consider the next level (a camera sensor cleaning kit with swabs for wet cleaning).
How to Wet Clean a DSLR Camera Sensor (Wet Sensor Cleaning)
Wet sensor cleaning is the next step when air alone can’t fix the spots. The short answer: it’s a gentle swipe with a sensor swab and a few drops of sensor-safe fluid. I only do this when I see stuck dots or oily marks that keep showing up after the blower. It feels scary at first, but with the right camera sensor cleaning kit, it’s very controlled.
When Should You Use Wet Sensor Cleaning?
Use wet cleaning when the blower does its best and the marks still laugh at you. The short answer: if spots stay after dry cleaning, you may need wet sensor cleaning. This is common with oily dots, sticky dirt, or faint streaks that won’t lift. If your test photo at f/16 still shows the same spots, wet cleaning makes sense.
What You Need for Wet Sensor Cleaning
Don’t improvise here, this is one time the right tools really matter. The short answer: you need the correct swab size and a sensor-safe fluid. Here’s the simple list:
- Correct-size sensor swab (APS-C or full-frame)
- Sensor-specific cleaning fluid (made for camera sensors)
- A clean indoor workspace (no fan, no open window)
- Fully charged camera battery
- Fresh swabs (single-use is best)
Use wet cleaning when the blower does its best and the marks still laugh at you. The short answer: if spots stay after dry cleaning, you may need wet sensor cleaning. This is common with oily dots, sticky dirt, or faint streaks that won’t lift. If your test photo at f/16 still shows the same spots, wet cleaning makes sense.
Step 1: Choose the Correct Sensor Swab Size

Swab size is the make-or-break detail. The short answer: APS-C cameras need APS-C swabs, and full-frame cameras need full-frame swabs. A swab that’s too small can force extra passes and cause streaks. A quick note: the a6400 Sony uses APS-C swabs (even though it’s mirrorless, not a DSLR), so it always matches the sensor type, not the brand name.
Step 2: Apply the Cleaning Fluid Correctly
Less fluid is usually better. The short answer: put 2–3 small drops on the swab, not on the sensor. Never pour fluid straight into the camera because it can pool where you don’t want it. If the swab looks soaked, use a new one and start again.
Step 3: Make One Smooth Cleaning Pass
Now you’re going to do one calm swipe, like wiping a phone screen only gentler. The short answer: one slow, even pass is safer than lots of little rubs. Start at one edge of the sensor and glide to the other side in a single motion. Use light pressure; you’re not scrubbing a pan.
Step 4: Use the Clean Side for the Return Pass
Most sensor cleaning swabs have two clean sides for a reason. The short answer: flip to the clean side before you swipe back. This helps avoid dragging the same dirt across the sensor again. If you dropped the swab, touched it, or it looks dirty, tossing it doesn’t “save it.”
Step 5: Allow the Sensor to Dry
Give the fluid a moment to evaporate. The short answer: wait about 10–30 seconds before you judge the result. Don’t wave your hand over the camera or blow on it with your mouth. If you see light streaks right away, don’t panic often; they fade as the last bit dries.
Step 6: Take a New Test Photo
Finish the same way you started: with proof. The short answer: take another f/16–f/22 test shot and check at 100%. Compare it to your before photo in the same spots. If one or two marks remain, do one more pass only with a fresh swab, then stop and reassess.
How to Clean DSLR Sensor Without Damaging It
Knowing how to clean DSLR camera sensor surfaces safely is really about patience, not pressure. Treat the sensor like delicate photo paper, start gentle, use the right tools, and never rush. I remind myself of this every time, and it always keeps a small spot from becoming a big headache.
Always Start With the Least Invasive Method
Begin with the built-in cleaning mode, then try a blower before you even think about swabs. Once I skipped straight to a wet swab and turned a tiny speck into a streaky afternoon. Think of it like washing your hands: you always rinse before you scrub hard.
Use Only Sensor-Safe Cleaning Products
Use only fluid and swabs made for camera sensors, because household cleaners can harm coatings. Your sensor has delicate layers that can streak or scratch with the wrong liquid. If a bottle doesn’t clearly say it’s for sensor use, leave it in the drawer and grab a proper camera sensor cleaning kit instead.
Never Touch the Sensor With Your Fingers
Even clean fingers leave oils that smear and are hard to remove safely. Those oils can create new marks that need another cleaning pass to fix. I treat the sensor like a clean kitchen counter, look closely, but don’t poke it.
Never Apply Excessive Pressure
Light, even pressure is enough, because pressing harder won’t clean faster. Pushing down can stress or damage the delicate surface underneath. Imagine wiping a soft berry firm enough to clean it, gentle enough not to crush it.
Use the Correct Swab Size
Match the swab to your sensor APS-C or full-frame so you cover the area in one smooth pass. The wrong size either misses spots or forces extra swipes that risk streaks. Remember, the a6400 Sony uses APS-C swabs, so size always beats brand name here.
Use a Fresh Swab for Wet Cleaning
One fresh swab per pass means you never drag old dirt back across the sensor. Reusing a swab can scratch because trapped grit acts like fine sandpaper. If you drop it, touch it, or it looks dirty, toss it and open a new one there’s no “saving” swabs.
Never Force the DSLR Mirror
Always use the camera’s manual cleaning mode to lift the mirror safely; never push it with your finger. Forcing the mirror can damage the mechanism or knock it out of alignment. Let the camera do the moving. Your job is just to clean gently once it opens.
Keep the Camera Battery Sufficiently Charged
A full battery stops the camera from shutting off while the mirror is raised. If power dies mid-clean, the mirror could snap shut unexpectedly and cause damage. Charge it like you charge your phone before a long trip it’s the simplest safety step of all.
Common DSLR Sensor Cleaning Mistakes to Avoid
Most sensor issues come from rushing, not from the dust itself. I’ve seen people turn one tiny dot into a whole mess just by using the wrong tool once. If you remember nothing else, remember this: gentle + clean + slow is the winning combo for camera sensor cleaning.
Using Canned Compressed Air
Don’t use canned air on a camera sensor. It can blast too hard, and it can spit liquid that leaves marks. I know it feels like a fast fix, but it’s one of the easiest ways to make wet sensor cleaning necessary later.
Using Household Cleaning Products
Never use glass cleaner or random sprays on your sensor. These liquids can leave a film, and they are not made for sensor coatings. If it doesn’t clearly say sensor-safe, keep it far away and stick to a real camera sensor cleaning kit.
Using a Dirty or Reused Swab
A used swab can drag grit and scratch the surface. A swab is like a toothbrush: you don’t share it, and you don’t reuse it later. If you’re learning how to clean DSLR sensor parts safely, this is the rule that saves you from costly regret.
Applying Too Much Cleaning Fluid
More fluid does not mean more cleanliness. Too much liquid can cause streaks, and it can creep into edges where you can’t see it. For wet sensor cleaning, a few small drops on the swab is plenty.
Pressing Too Hard on the Sensor
Pressure is not your friend here. Pressing hard can increase streaks and raises the risk of damage. When I clean, I aim for just enough force to keep the swab flat, like wiping fog off a mirror.
Using the Wrong Swab Size
The swab must match your sensor size (APS-C or full-frame). A swab that is too small forces extra passes, and extra passes raise the risk of streaks. If you’re using an APS-C body (like many crop cameras), buy APS-C swabs don’t guess.
Cleaning in a Dusty Environment
Cleaning in a dusty room can add new dust while you work. If a fan is on, or a window is open, you’re basically cleaning in the wind. Pick a calm indoor spot, because a clean space makes camera sensor cleaning easier and safer.
Cleaning a Sensor That Does Not Need Cleaning
If you can’t see spots in a test photo, don’t clean just in case. Every clean is a tiny risk, even when you do it right. Take the f/16 test shot first, then decide with proof instead of fear.
Skipping the Before-and-After Test
The test photo is how you know the cleaning worked. Without it, you might keep cleaning when you’re already done, or miss a spot you still have. Save the before shot, repeat the same settings, and compare at 100%.
Attempting Cleaning With a Low Battery
Never start manual cleaning with a weak battery. If the camera dies while the mirror is up, things can snap shut at the worst time. Charge first, then clean this one habit alone makes the whole how to clean DSLR camera sensor process feel much less scary.
How to Clean the Sensor on a Sony a6400
The a6400 Sony is a mirrorless camera, not a DSLR, so the sensor sits much closer to the lens mount. The moment you remove the lens, you can basically “see” the area that makes your photo. That’s why camera sensor cleaning on the a6400 can feel a bit more intense at first.
The big difference is that the sensor can be more exposed during lens swaps. On many DSLRs, the mirror sits in front until you go into a special mode, but the a6400 doesn’t work like that. So if you change lenses outside, dust has a straight path in.
Don’t copy DSLR mirror-lock steps for this camera. The a6400 has no mirror to lock up, so those DSLR instructions can confuse you and make you poke around more than you should. Instead, follow Sony’s own “Cleaning Mode” steps in your manual so the camera is in the right state before you clean.
Start dry, and only go wet if you must. Hold the mount facing down and use a rocket blower first, just like you would with DSLR camera sensor cleaning. If the spots stay after a test photo, then use a camera sensor cleaning kit with APS-C swabs (the a6400 is APS-C), and do wet sensor cleaning with 2–3 drops on the swab.
Keep it simple and gentle with this mini checklist:
- Charge the battery fully.
- Clean the outside first (mount area, caps, rear lens).
- Use Cleaning Mode if Sony recommends it.
- Blow dust out with the mount facing down.
- If needed, do one smooth wet swab pass, flip, and one return pass.
- Take a new f/16 test photo to confirm the result.
How Often Should You Clean a DSLR Camera Sensor?
There Is No Fixed Cleaning Schedule
There’s no every month rule for camera sensor cleaning. Some people shoot for a year and never see a spot. Others swap lenses all weekend and need a clean fast. I treat it like checking tire pressure you check when you notice a problem, not just because the calendar says so.
Clean the Sensor When Dust Appears in Your Photos
Clean your sensor only when you can see dust in real photos (or in a test shot). If your images look clean at f/8 and you never shoot skies at f/16, you may not need to touch anything. When spots show up, start with the blower first. Save wet sensor cleaning for marks that won’t move.
Factors That Increase Sensor Cleaning Frequency
The more your camera is open to air, the more dust can get in. If any of these sound like your life, you’ll likely clean more often:
- Frequent lens changes (events, weddings, run-and-gun shoots)
- Outdoor photography (beach, trails, sports fields)
- Travel (airports, bags, new climates)
- Dusty locations (roads, deserts, dry parks)
- Wildlife photography (quick swaps in the field)
- Landscape photography (lots of f/11–f/22 shots where dust shows more)
Why Over-Cleaning Is Not Recommended
Every cleaning pass is a small risk, even when you do it right. Extra swipes can cause streaks, and reused tools can add grit. If you’re not seeing spots, leave the sensor alone and just keep your caps and mount area clean. Gentle habits beat constant cleaning.
Regular Camera Maintenance and Sensor Care
Good daily care means fewer deep cleans later. Use a body cap, keep the mount facing down during lens swaps, and blow out loose dust now and then. Also, keep an eye on overall wear, because a well-kept camera tends to stay cleaner inside. If you’re curious about long-term care, check how long do DSLR cameras last.
How to Prevent DSLR Sensor Dust
You can’t stop dust forever, but you can slow it down a lot. I think of sensor dust like crumbs on a kitchen counter. If you clean as you go, it never becomes a big job. These small habits also mean you’ll need wet sensor cleaning less often.
Change Lenses in a Clean Environment
Change lenses indoors or in a calm spot when you can. If I’m at home, I do lens swaps near a table, away from open windows. Outside, I look for cover like a car seat or a doorway. Even turning your body into a wind block helps.
Keep the Camera Mount Facing Down
Point the mount down so dust falls out, not in. It works like flipping a cup upside down so nothing settles inside. Even when you’re in a rush, that small angle can save you time later. It’s one of the easiest ways to reduce camera sensor cleaning.
Minimize the Time the Camera Is Without a Lens
Keep the camera open for as little time as possible. Before you remove the lens, have the next lens ready with the rear cap off. I treat it like a quick pit stop. Swap, click, done.
Clean Lens Rear Elements and Lens Caps
Dirty rear elements and dusty caps can send dust straight into the camera. I wipe the rear lens area and the inside of caps with a clean microfiber cloth once in a while. It’s a small habit, but it matters. This also helps your camera sensor cleaning kit last longer.
Use the Camera’s Automatic Sensor Cleaning Function
If your DSLR has a built-in sensor cleaning option, turn it on. Many cameras can shake off loose dust when you power on or off. It won’t fix oily spots. But it can reduce how often you need to clean a DSLR sensor by hand.
Store Your Camera Properly
Store your camera with a body cap or a lens on, in a clean bag or case. Leaving a camera uncapped is like leaving food out. Something will land on it. I also avoid tossing loose caps in dusty pockets.
Avoid Lens Changes in Windy or Dusty Conditions
If the wind is kicking up dirt, don’t change lenses unless you have to. If you must swap, turn your back to the wind and keep the camera facing down. This one trick prevents a lot of stubborn specks. And it helps you avoid wet sensor cleaning later.
What to Do If Sensor Spots Remain After Cleaning
Spots that stay can feel so annoying, like you did all that work for nothing. This happens a lot, and it does not mean you failed. Most of the time, it just means the dust is stuck, oily, or you’re looking at something else. The goal now is to slow down, test again, and only clean more if you truly need to.
Take Another Dust-Test Photo
Do the same test photo again, using the same settings as before. A plain wall or blue sky works best, and f/16 to f/22 makes spots easier to see. Zoom in to 100% and check the exact areas you noted earlier. This keeps you from guessing and over-cleaning.
Check Whether the Spots Are Actually Sensor Dust
Make sure it’s not lens dirt, a filter smudge, or a weird shadow from the scene. Clean the front and rear lens elements and remove any filter, then take the test shot again. If the spot stays in the same place even with a different lens, it points back to the sensor. If it moves or changes a lot, the problem is likely not the sensor.
Look for Oil or Stubborn Residue
Dust usually looks like tiny dots, but oil can look like soft blobs or little rings. If you used a blower and nothing changed, that’s a clue you’re dealing with stuck residue. This is where wet sensor cleaning with a proper camera sensor cleaning kit can help. It’s also why using the right sensor-safe fluid matters so much.
Perform Another Cleaning Pass Only When Necessary
If you decide to clean again, do it in the safest way. Start with the blower one more time, with the camera mount facing down, and re-test. If you already did wet cleaning, use a brand-new swab and do just one smooth pass each way. More passes do not mean better results, and extra swipes are what cause streaks.
When You Should Stop and Seek Professional Cleaning
If spots won’t go away after a careful blower + one or two wet passes, it’s time to stop. If you see heavy streaks, large smears, or you feel unsure about the next step, a pro cleaning is worth it. Also stop right away if you think you may have touched the sensor with a tool tip or a dirty swab. Sometimes the best DIY skill is knowing when to hand it off and protect your camera.
DIY Sensor Cleaning vs. Professional Camera Cleaning
Sensor cleaning is safe to do at home for most people. I used to think it was pro only, but once I learned the steps, it felt more like basic care than a risky stunt. Still, some cases are better handled by a shop. The trick is knowing which situation you’re in.
Advantages of DIY Sensor Cleaning
DIY camera sensor cleaning is fast and cheap once you have the tools. You can test, clean, and re-test in the same hour, which is a lifesaver before a trip or a paid shoot. It also helps you stay calm when you see spots, because you know what to do. A simple camera sensor cleaning kit (blower + the right swabs) can cover most normal dust.
Risks of Cleaning the Sensor Yourself
DIY cleaning has small risks if you rush or use the wrong stuff. A dirty swab, the wrong swab size, or too much fluid can leave streaks that look worse than the original spots. Wet sensor cleaning also takes a steady hand, because extra passes can add marks. If you feel tense or shaky, it’s okay to pause and not force it.
When Professional Cleaning Is Better
Professional cleaning is the safer pick when the problem won’t go away after careful steps. If you see the same spots after a blower and one or two gentle swab passes, you may be dealing with oil, stuck grit, or residue that needs expert tools. It’s also smart to go pro if you suspect a scratch, if something got on the sensor that you can’t name, or if you have mirror or shutter worries on a DSLR. And honestly, if you hate the idea of doing it yourself, that’s a valid reason too.
How to Decide Which Option Is Right for You
Do it yourself when the dust is light, your test photo proves it’s the sensor, and you’re using sensor-safe tools. Go to a pro when you feel unsure, when the marks look like smears or blobs, or when repeated cleaning attempts are starting to pile up. A good rule I follow is two careful tries max, then I stop. That mindset protects your gear and your peace of mind while you learn how to clean DSLR sensor spots the right way.
FAQs
Yes, most people can do basic camera sensor cleaning at home. Start with the least risky step, like the camera’s built-in cleaning and a manual air blower. I was nervous my first time, but once I did a test shot and saw the spots match, it felt much more normal. If you feel unsure, pro cleaning is still a smart choice.
The safest way is to start dry, then go wet only if you must. Use a clean indoor space, a full battery, and your camera’s manual cleaning mode if your DSLR has it. Blow loose dust out with the mount facing down. If spots stay, use a proper camera sensor cleaning kit with the correct swab size and sensor-safe fluid.
If you do not have a kit, stick to the built-in cleaning and a rocket blower. Do not use tissues, cotton buds, or random cloth. A blower can fix a lot of loose dust, and it is the safest “no kit” option. If the spots stay, wait and get the right swabs and fluid, or book a shop clean.
No, do not wipe the sensor with a microfiber cloth. Microfiber is great for the outside of the camera and the lens, but it can drag grit on a sensor. It can also leave fibers behind. Use sensor swabs made for camera sensors instead.
Do not use general alcohol from home. It can streak, and it may not be safe for sensor coatings. Use only sensor-safe cleaning fluid made for wet sensor cleaning. If you are not sure what the liquid is, do not put it near your sensor.
Yes, wet sensor cleaning is safe when you do it the right way. Use the correct swab size (APS-C or full-frame), add only a few drops, and make one smooth pass each way. Do not scrub or press hard. If you feel shaky or the marks look odd, a pro clean is safer.
Conclusion
To clean your sensor the safest way, first confirm it’s really dirty by taking a quick dust-test photo at f/16–f/22 and checking it at 100%, then run your camera’s built-in cleaning if it has it, use a manual blower with the mount facing down, and only move to wet sensor cleaning with the correct swab size and sensor-safe fluid if spots still remain; re-test after each step, avoid repeated passes, and if marks won’t budge or you feel unsure, get professional help this simple order keeps camera sensor cleaning controlled and helps you learn how to clean DSLR sensor dust without damage using a proper camera sensor cleaning kit.