
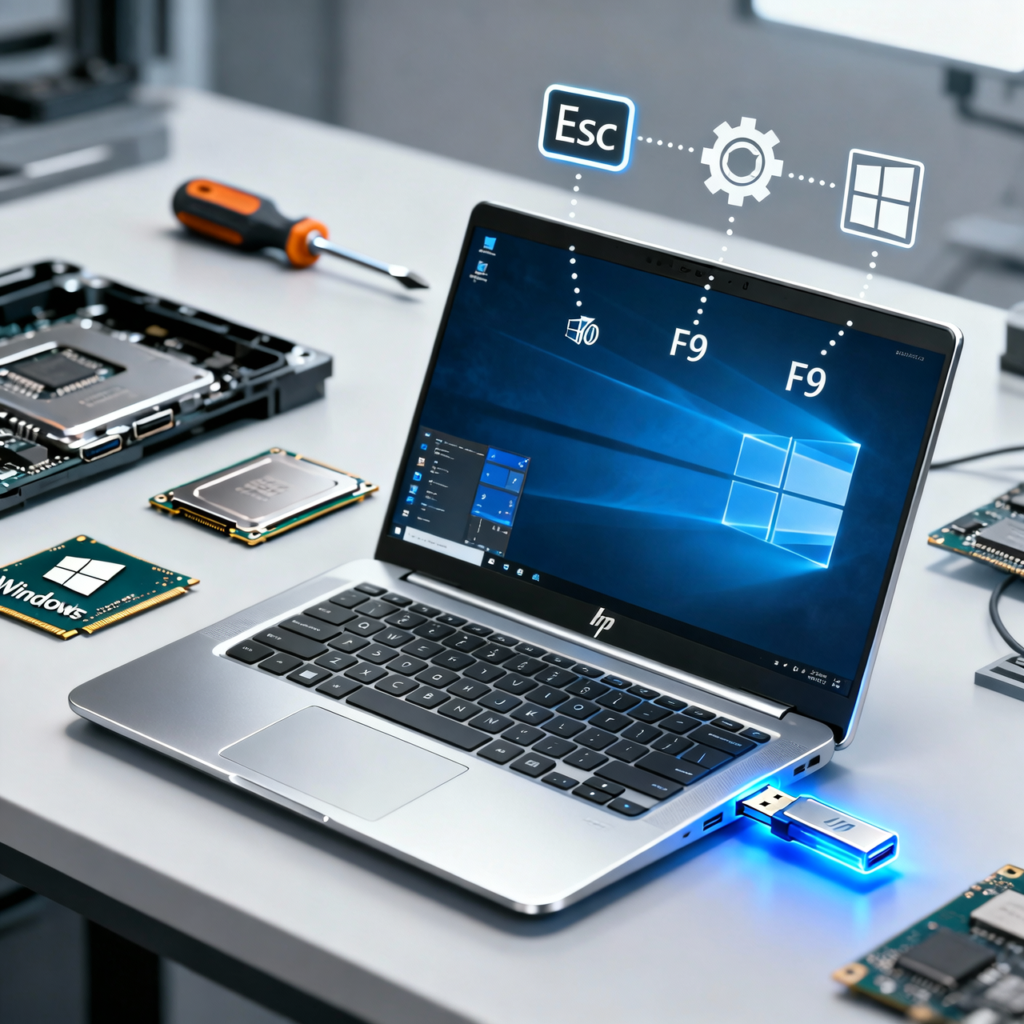
Boot from USB HP Laptop sounds a bit scary at first, but it is actually one of the easiest ways to fix problems or install Windows 10 or 11 on an HP laptop. Many people ask “can I boot my HP laptop from USB?” when the system crashes or they want a fresh start, and the answer is almost always yes.
As a computer technician, this simple step has saved many late nights in homes, small shops, and college hostels where a dead Windows screen felt like the end of the world. In this guide, the process of how to boot HP laptop from USB will be shown in clear steps, from the HP laptop boot menu key to HP boot from USB Windows 10/11 for both new and older models. Read this till the end, follow each step, and the laptop will start from USB with much less stress and confusion.
Can I Boot My HP Laptop from USB?
Yes, you can boot an HP laptop from USB on almost all models, even with Windows 10 and 11. Think of it like telling the laptop, “today, start from this pen drive instead of the internal drive.” This is how many technicians install Windows, test Linux, or run repair tools when the system is not starting. So if the question in mind is “can I boot my HP laptop from USB?” the quick answer is yes, in most cases it is fully supported.
Yes — almost all HP laptops support USB boot
Almost all recent HP laptops support USB boot through the startup menu or BIOS, so HP boot from USB Windows 10 and 11 is a standard feature, not a trick. In daily work, many laptops come in with a dead Windows screen, and a simple boot from USB HP laptop often brings them back to life. As long as the HP laptop boot menu key is used at the right time and the USB is made the right way, the device will show in the list. For beginners, this means you do not need special hardware, just some care and the right steps.
Requirements
To make boot from USB HP laptop work smoothly, a few basic things are needed. These small points decide whether the USB shows in the menu or not, so they matter more than the brand of pen drive.
Bootable USB drive

The USB must be a proper bootable USB drive, not just a normal one with setup files copied to it. Use tools like the Windows Media Creation Tool or Rufus so the USB has the right boot files, partition style, and file system. When this is done right, the HP laptop can see the USB as a startup device instead of treating it like a simple storage stick.
Correct BIOS settings
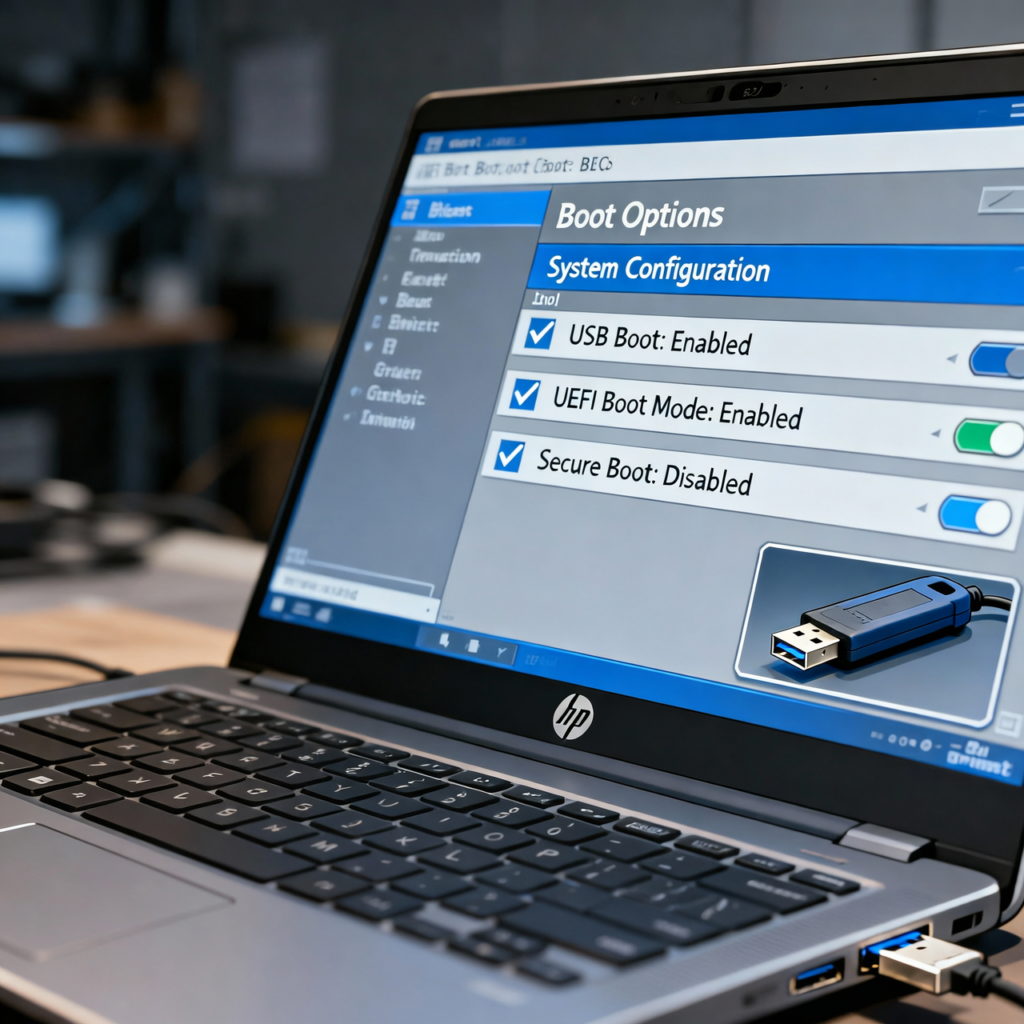
The BIOS or UEFI settings must allow USB boot, or the laptop will skip the pen drive and go straight to Windows. In most HP laptops, USB boot is under Boot Options or System Configuration, and it should be set to enabled. If the system is set to only trust internal storage, the USB will not appear in the HP laptop boot menu key list, even if the drive is fine.
USB Legacy/UEFI enabled
The USB mode must match how the drive was created, either Legacy, UEFI, or both. For modern Windows 10 and 11 installs, UEFI with GPT is the best choice, so UEFI support must be on in BIOS. If the USB was made in Legacy mode, then Legacy support has to be enabled as well, or the HP laptop may act like nothing is plugged in.
Common mistake users make
A very common mistake is thinking any USB with Windows files on it can boot, then getting confused when the HP laptop ignores it. Many users also forget to press Esc and F9 for the boot menu, so the system just loads normal Windows and they assume the USB is bad. Another frequent issue is leaving Secure Boot on while using an older tool or wrong format, which silently blocks the USB from starting. When these small but important details are fixed, can I boot my HP laptop from USB stops being a scary question and turns into a simple, reliable step in your troubleshooting toolkit.
HP Laptop Boot Menu Key (Most Important Section)
When the goal is boot from USB HP laptop, the HP laptop boot menu key is the real hero. This key tells the laptop to pause for a moment at startup and ask where to boot from, like giving you a small menu before breakfast. Instead of going deep into BIOS each time, this quick menu lets you choose the USB drive just for that one boot. For most HP laptops, this simple shortcut is the fastest and safest way to start from a bootable USB.
What Is the HP Boot Menu Key?
On HP laptops, the main key is Esc, which opens the Startup Menu right after you power on the system. From that Startup Menu, F9 opens Boot Device Options, where the USB drive can be selected if it is detected. F10 opens BIOS Setup, where deeper settings like boot order and Secure Boot are changed when needed. So in daily use, remember this small map: Esc for Startup Menu, F9 for boot menu, and F10 for BIOS setup.
How to Access Boot Menu on HP Laptop
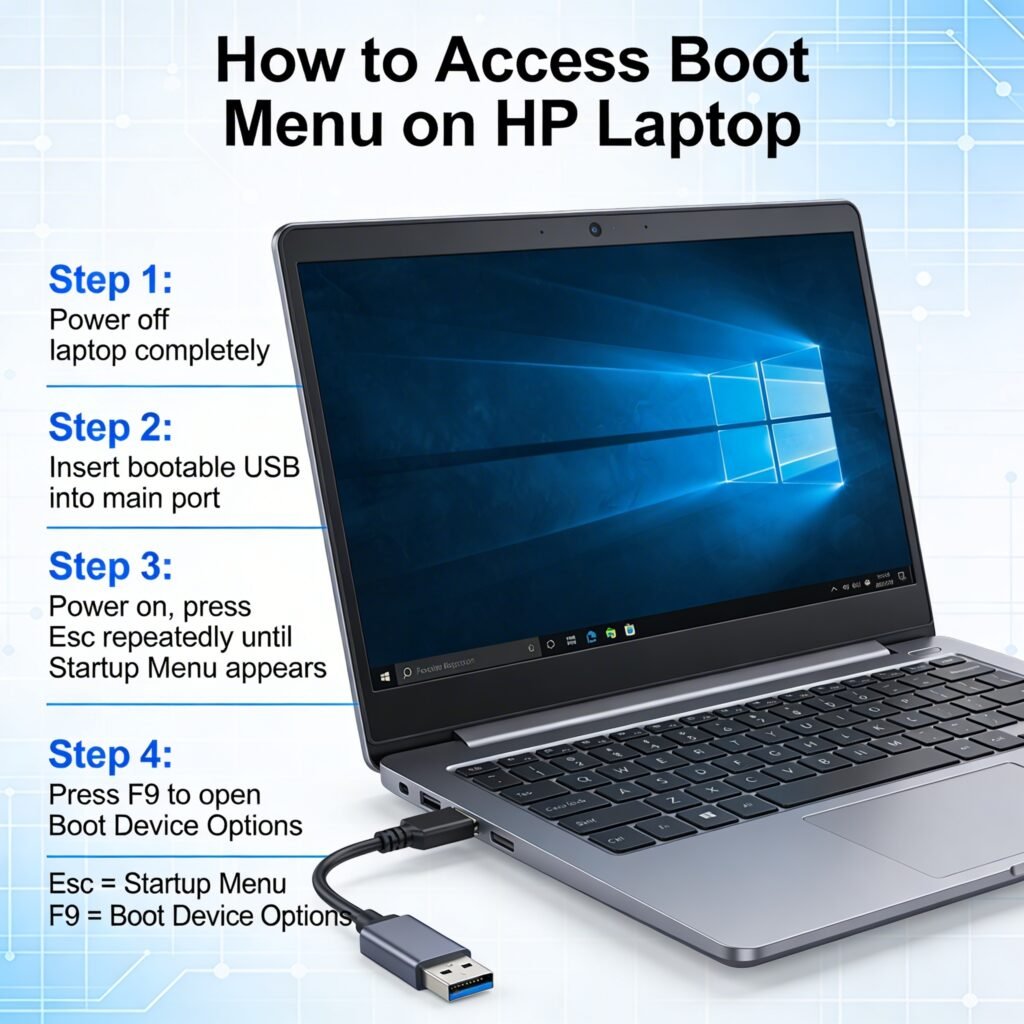
Use these simple steps whenever you want to boot from USB HP laptop without changing the full boot order:
- Turn off the HP laptop completely and wait a few seconds so it fully powers down.
- Insert the bootable USB drive into a USB port, ideally a main port directly on the laptop.
- Press the power button and, as soon as the screen turns on, press the Esc key again and again until the Startup Menu appears.
- On the Startup Menu screen, press F9 to open Boot Device Options, where all available boot devices are shown.
- Use the arrow keys to highlight the USB drive in the list, then press Enter to start HP boot from USB Windows 10 or 11 setup or any other tool on that drive.
If the USB does not appear in this menu, even after using the correct HP laptop boot menu key, it usually means the USB is not created as a proper bootable drive or a firmware setting is blocking it. In that case, recreate the USB with a reliable tool, then check BIOS or UEFI options like Secure Boot and Legacy support.
How to Boot HP Laptop from USB (Step-by-Step Guide)
When the goal is boot from USB HP laptop, two main methods work on almost every Windows 10 and 11 model. The first method is a temporary boot from USB using the boot menu, and the second method is changing the boot order inside BIOS. Both methods use the same bootable USB, but the way the laptop chooses that USB is different. Start with the temporary method first, because it is the fastest and safest for beginners.
Method 1: Temporary Boot from USB (Boot Menu Method)
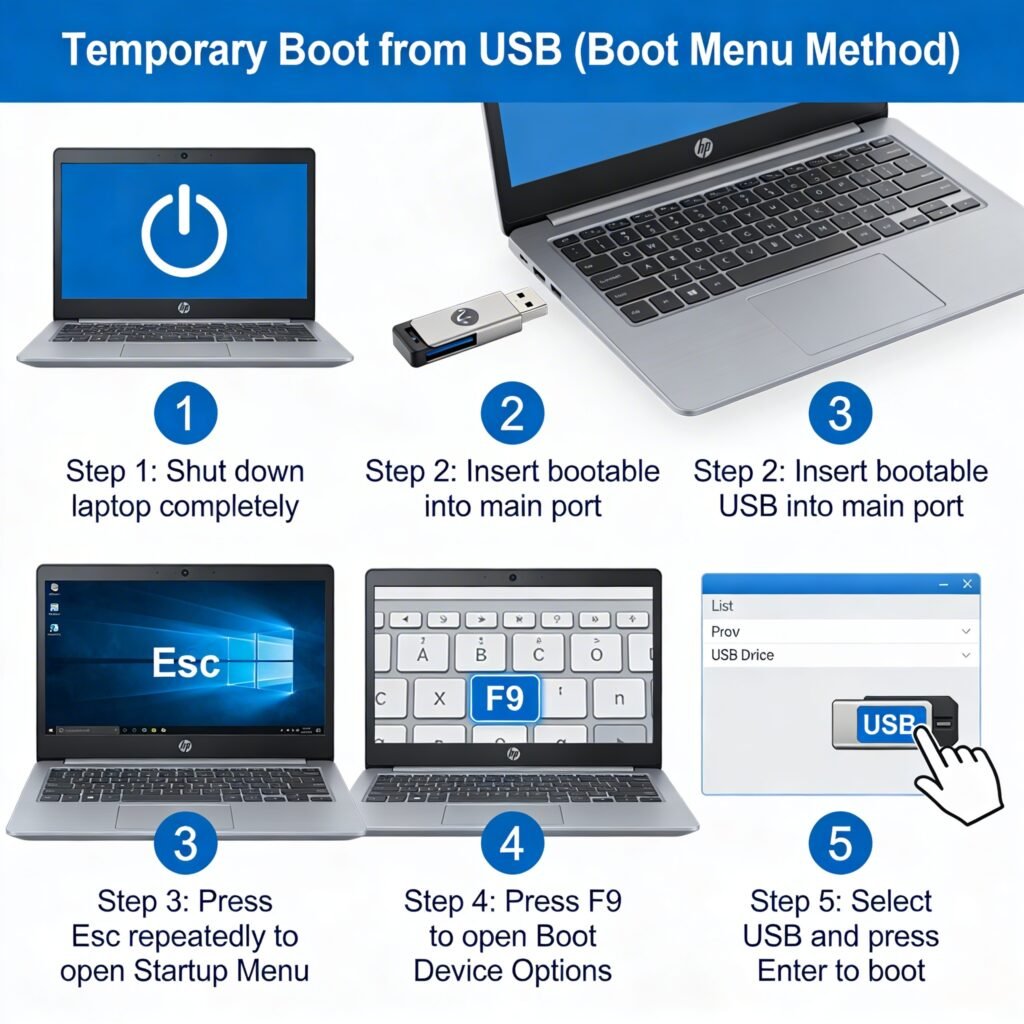
This method is the best option when you want to boot from USB HP laptop only once, for tasks like Windows install, repair, or running a live Linux tool. It does not change the main boot order, so after the work is done, the laptop goes back to normal and starts from the internal drive again. Many technicians use this method every day because it is quick, safe, and works well even if someone is new to BIOS settings.
Follow these steps for a temporary USB boot using the HP boot menu:
- Shut down the laptop
Turn off the HP laptop completely and wait a few seconds so it fully powers down. A proper shutdown helps the system detect the USB cleanly at the next start.
- Insert the bootable USB drive
Plug the bootable USB into a main USB port on the laptop. For best results, avoid old or loose hubs and use a port directly on the laptop body.
- Open the HP Startup Menu
Press the power button, and as soon as the screen comes on, press the Esc key again and again. Keep tapping until the Startup Menu appears on the screen.
- Open Boot Device Options (Boot Menu)
On the Startup Menu, press F9 to open Boot Device Options. Here you should see a list of all devices that the HP laptop can boot from, including your USB.
- Select the USB and start from it
Use the arrow keys to highlight the USB drive name, then press Enter. The laptop will now start the setup or tool on the USB, such as HP boot from USB Windows 10 or Windows 11 installer.
If you only need to install Windows or run a repair once, this temporary boot menu method is enough. For a screenshot guide, try to capture each screen: Startup Menu, Boot Device Options, and the list where the USB is visible, so any user can match their screen with the steps.
Method 2: Change Boot Order from BIOS
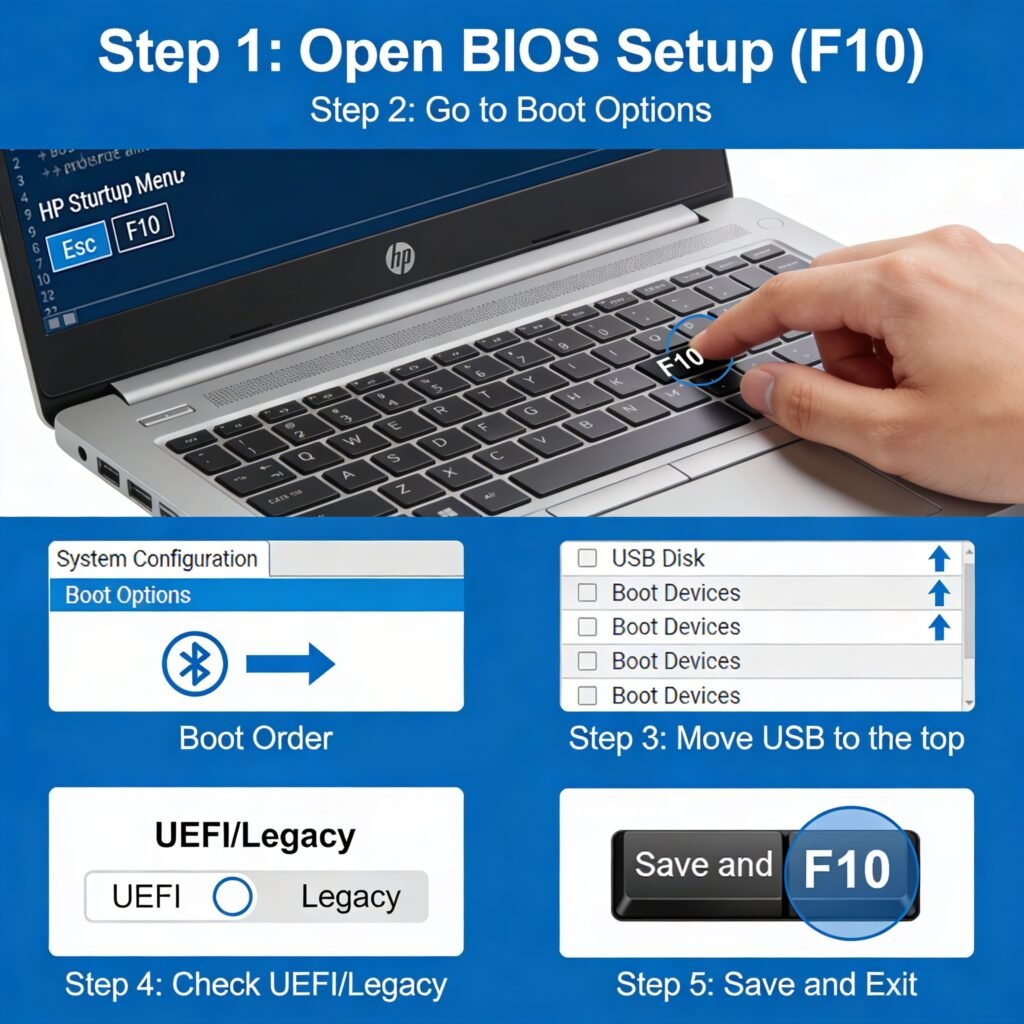
This method is useful when you want the HP laptop to always check the USB first, or when the boot menu key is hard to time. It works well if you are setting up many devices or running the USB tool several times. In this case, you change the boot order in BIOS so USB sits above the internal hard drive in the list.
Here is how to change the boot order from BIOS on an HP laptop:
- Open BIOS Setup (F10 from Startup Menu)
Turn off the laptop, then power it on and press Esc repeatedly to open the Startup Menu. On that screen, press F10 to enter BIOS Setup.
- Go to Boot Options
Inside BIOS, use the arrow keys to move to the System Configuration or Boot tab, depending on the HP model. Look for Boot Options or a similar line that shows the boot order.
- Move USB to the top
In the boot order list, find the entry for USB Disk, USB Hard Drive, or the name of your USB brand. Use the on‑screen help (usually shown at the bottom) to move the USB device to the top of the list, above the internal hard drive.
- Check UEFI / Legacy as needed
On the same screen, confirm that UEFI or Legacy Support matches how your bootable USB was created. For most Windows 10 and 11 users, UEFI mode is the best option.
- Save and Exit
Press F10 or select Save Changes and Exit (the exact wording may vary). Confirm when asked. The laptop will restart and now try to boot from USB first, so the HP boot from USB Windows 10 or 11 process starts automatically when the USB is plugged in.
If you want to go back to normal later, return to BIOS and move the internal hard drive back to the top, or simply remove the USB and the system will fall back to the next device in the boot order. By using these two methods, Method 1 for quick temporary use and Method 2 for a more fixed setup, anyone can boot HP laptop from USB with confidence, even on a first try.
HP Boot from USB Windows 10 / 11 (UEFI & Secure Boot Guide)
This part is where most users feel stuck, because UEFI, Secure Boot, GPT, and Legacy sound very complex. In simple words, these settings decide which devices your HP laptop trusts when starting, and how it reads the USB. Once these are set correctly, HP boot from USB Windows 10 or 11 works smoothly, even on newer models that ship with strict security on by default. Think of this section as a small map to match your USB with the right firmware settings so the laptop does not block it.
For Windows 11 (Secure Boot Enabled)
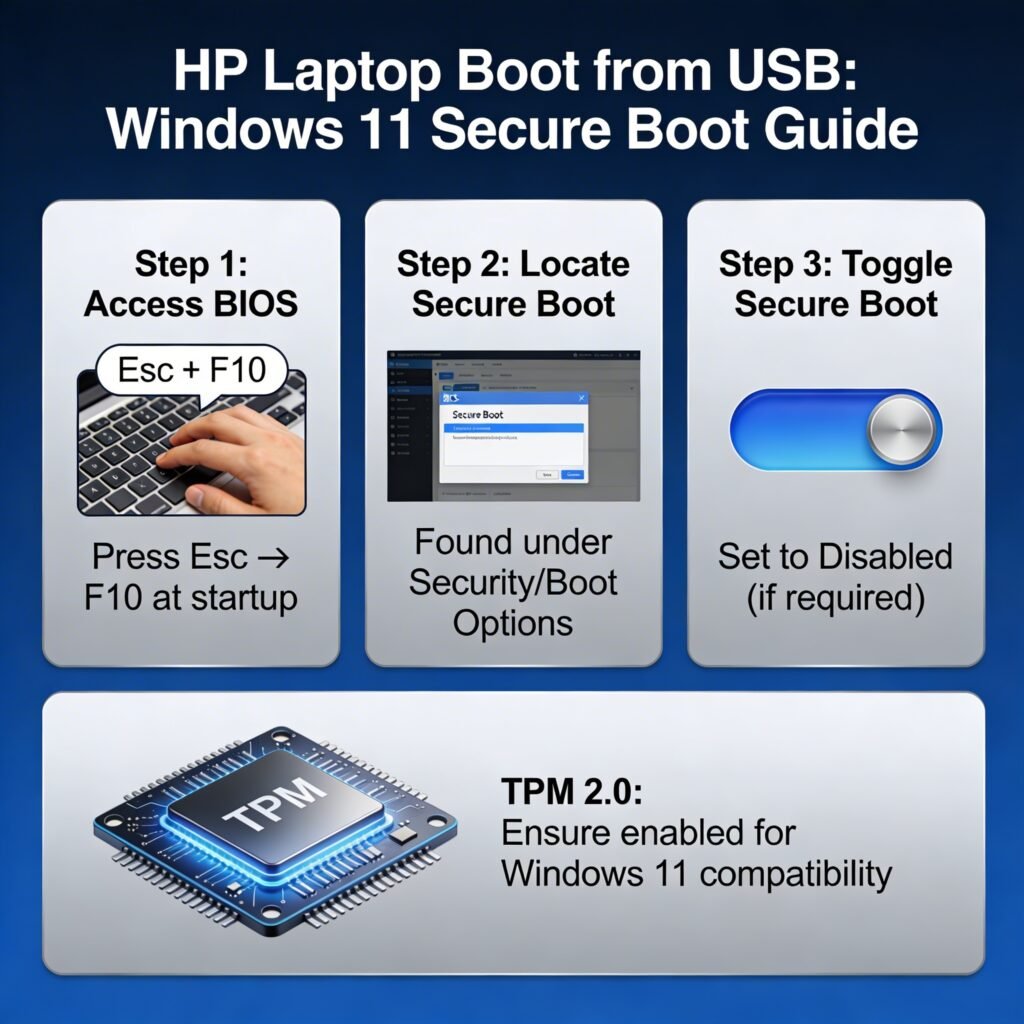
Most HP laptops that run Windows 11 use UEFI and have Secure Boot enabled from the factory. Secure Boot is a security feature that checks if the system is loading trusted software, which is good for safety, but it can block some custom tools or old installers from USB. For a standard Windows 11 install USB made with the official Microsoft tool, Secure Boot and UEFI usually work fine without change. The issue starts when the USB is made with other tools or contains older files.
Disable Secure Boot (if required)
Sometimes, to boot from USB HP laptop with a custom tool or older image, Secure Boot needs to be turned off. Go into BIOS Setup (Esc → F10), then look for Secure Boot under Security or Boot Options. Set Secure Boot to Disabled, and if asked, confirm or enter a basic code shown on the screen. This change lets the HP laptop accept more kinds of bootable USB drives, but use it only when needed and turn it back on after the work is done for better protection.
Enable UEFI mode
For Windows 11, UEFI mode is the recommended and often required option. In BIOS, check under Boot Options that UEFI Boot Mode is enabled, and Legacy support is either off or only used when you know the USB is Legacy. Make sure the USB itself was created as a UEFI bootable drive with GPT partition style, because a Legacy-style USB may not start Windows 11 setup at all. When UEFI and the USB format match, HP boot from USB Windows 11 becomes much more reliable.
TPM explanation (brief)
Windows 11 also checks for TPM 2.0, which is a small security chip or firmware feature that stores keys and helps with encryption. TPM is not about the USB itself, but about whether the laptop meets Windows 11 security rules. In BIOS, TPM may show as TPM Device, Security Chip, or fTPM under the Security tab. If TPM is off, turning it on helps pass the Windows 11 check, so the install from USB can complete without extra tricks.
For Windows 10
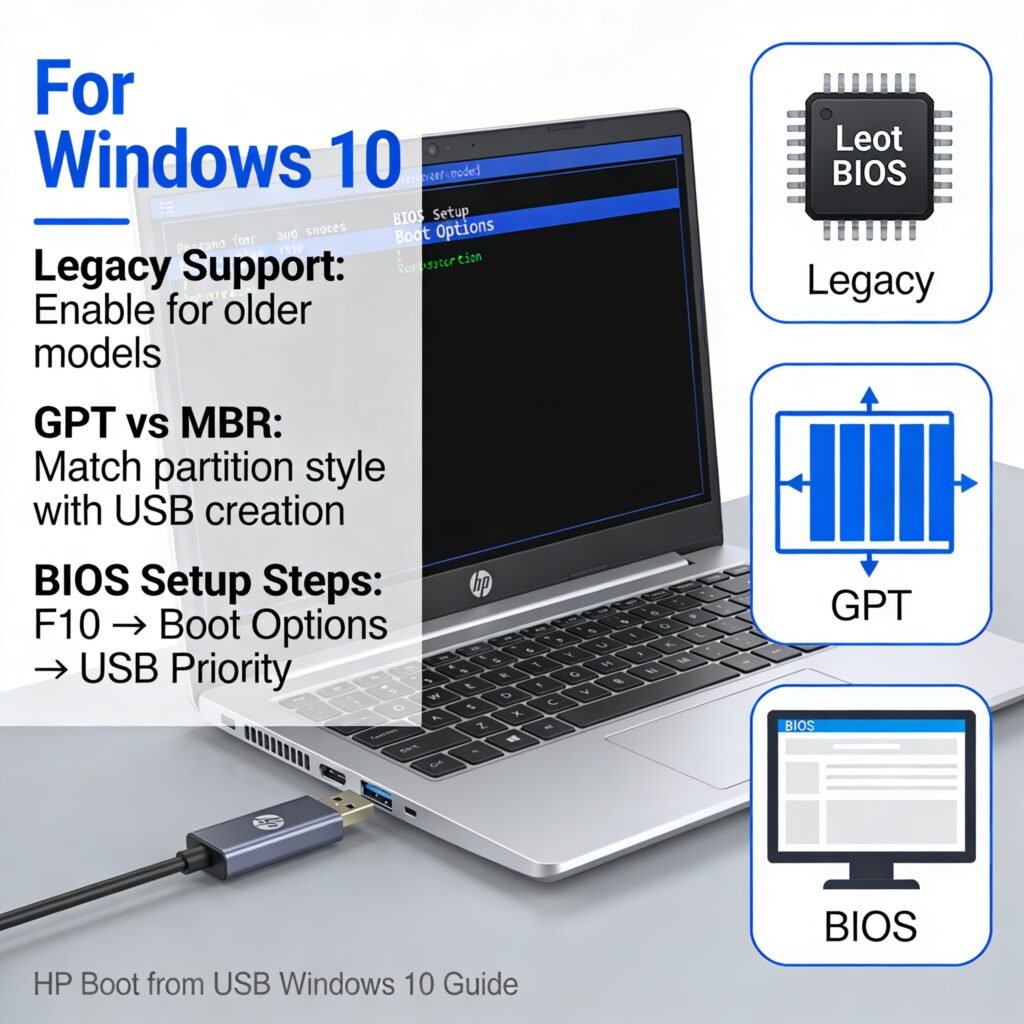
Windows 10 is more flexible than Windows 11, so HP boot from USB Windows 10 works on both older Legacy BIOS systems and newer UEFI systems. The main job is to match how the USB is made with the mode the laptop uses. Older HP laptops sometimes only boot in Legacy mode, while newer ones prefer UEFI by default, so understanding this match saves a lot of trial and error.
Legacy Support (if older model)
On older HP laptops, or when using very old tools, you may need to turn on Legacy Support. In BIOS, go to Boot Options and look for Legacy Support or Legacy Boot and set it to Enabled. When Legacy is on, the laptop can start from USB drives that are not UEFI-aware, which helps with some older Windows 10 images or utilities. Just remember that when Legacy is active, Secure Boot usually has to be off, because the two do not work together.
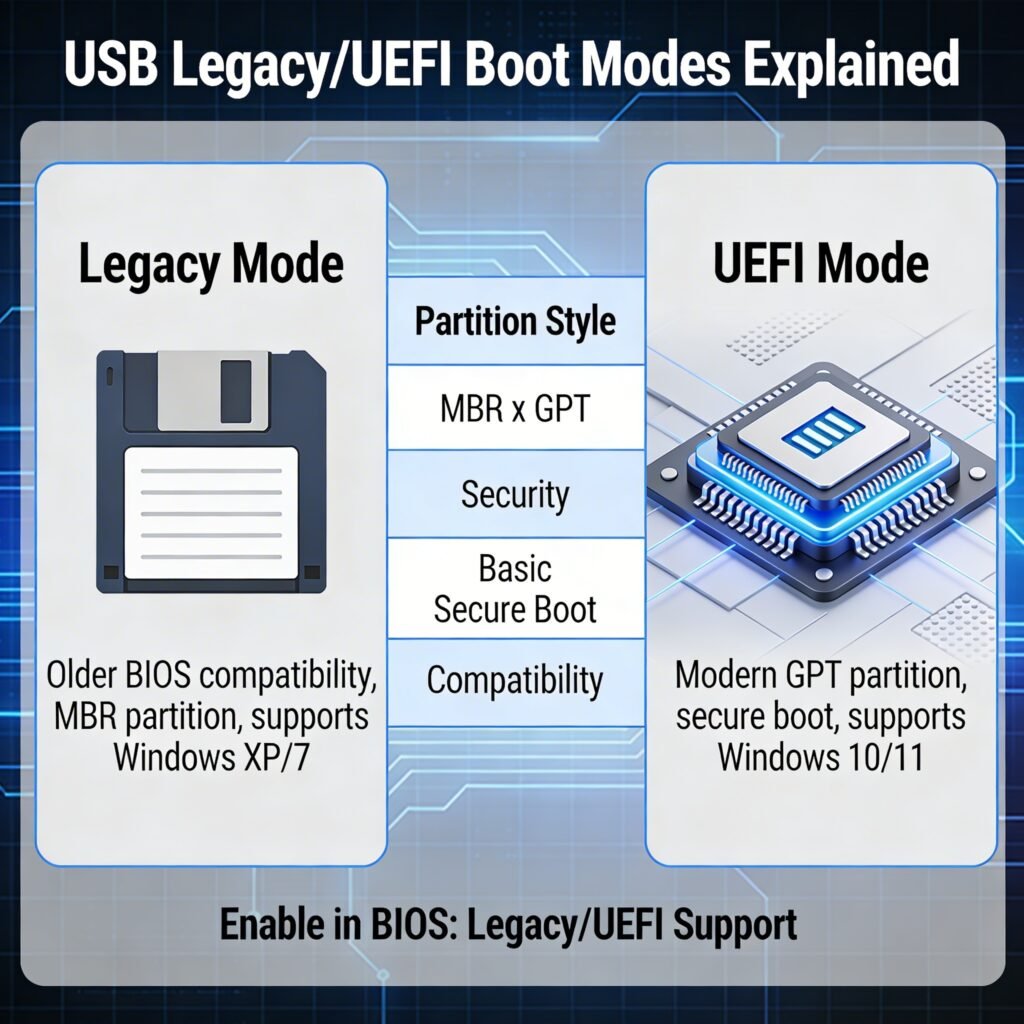
GPT vs MBR explanation
For Windows 10, the USB can use either GPT or MBR partition style, but the choice should fit the mode:
- UEFI mode works best with GPT.
- Legacy mode is usually paired with MBR.
Tools like Rufus let you pick this before creating the USB. When users mix these by mistake, for example GPT USB with strict Legacy-only BIOS, the HP laptop may ignore the USB at boot. Matching GPT with UEFI and MBR with Legacy gives a clean path so boot from USB HP laptop works on both old and new devices.
After Windows is installed and running from that USB setup, a useful next step is learning simple tricks such as taking clear screen captures during setup or error messages. For that, a dedicated guide like How to Screenshot on HP Laptop (Windows 10 & 11 – All Methods Explained) can help you document issues and share them with support or friends more easily.
USB Not Showing in Boot Menu? (Troubleshooting Section)
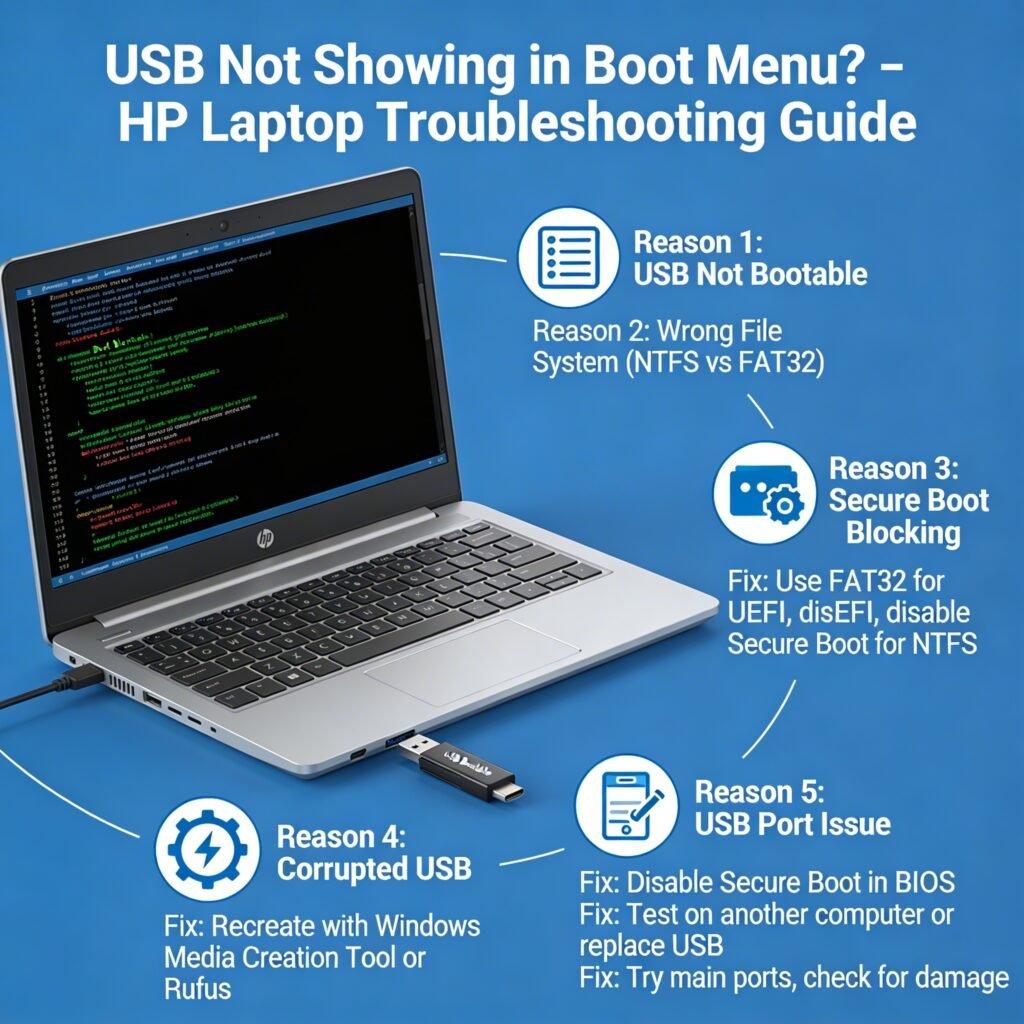
This is the point where many users feel stuck: the HP laptop boot menu key is pressed correctly, but the USB is missing from the list. When this happens, it usually means there is a small mismatch between how the USB was made and how the laptop is set to boot. The good news is that most of these problems come down to a few common causes that can be fixed step by step. Think of this section as a checklist to follow when USB not showing in boot menu on an HP laptop.
Reason 1: USB not bootable
One of the most common reasons is that the USB is simply not bootable. Copying Windows setup files or an ISO directly onto a USB does not make it a boot drive. The HP laptop then treats it like a normal storage device and skips it during boot, so it never appears in the list.
Fix:
Recreate the USB using a proper tool:
For Windows 10 or 11, use the official Windows Media Creation Tool.
For other ISOs, use a tool like Rufus and choose the correct options (UEFI/GPT or Legacy/MBR).
When the USB is created as a true bootable device, HP boot from USB Windows 10 / 11 works much more reliably.
Reason 2: Wrong file system (NTFS vs FAT32)
Another common issue is the wrong file system, usually NTFS vs FAT32. Many HP laptops with UEFI and Secure Boot prefer or require a FAT32 formatted USB for UEFI boot. If the USB is NTFS and Secure Boot is on, the system may refuse to boot from it and hide it from the menu.
Fix:
If using Rufus, pick:
Partition scheme: GPT (for UEFI)
File system: FAT32 (for best UEFI compatibility)
For very large install files or special tools that need NTFS, Secure Boot may need to be disabled in BIOS so the laptop can accept the NTFS USB.
By matching file system and firmware mode, the USB is much more likely to appear in the boot menu.
Reason 3: Secure Boot blocking
On many newer HP laptops, Secure Boot can block some USB tools, older ISOs, or non‑Microsoft bootloaders. In that case, the USB may be plugged in and bootable, but Secure Boot silently stops it from loading and it may not show as a valid option.
Fix:
Open BIOS Setup (Esc → F10 at startup).
Go to Security or Boot Options.
Find Secure Boot and set it to Disabled.
Save and exit, then try boot from USB HP laptop again.
Once your work is done, it is safer to turn Secure Boot back on to keep normal protection for daily use.
Reason 4: Corrupted USB
Sometimes the USB drive itself is corrupted or has bad sectors. In that case, even a correct Rufus or Media Creation Tool run can fail silently, and the HP laptop may either not see the device or refuse to boot from it. This often happens with very old or cheap pen drives that have been used many times.
Fix:
Test the USB on another computer to see if it boots there.
If it fails, back up any important data and do a full format, then recreate the bootable USB.
If problems remain, switch to a different USB stick from a reliable brand.
A fresh, healthy USB makes HP boot from USB Windows 10 / 11 far more stable.
Reason 5: USB port issue
Sometimes the problem is not the USB drive, but the USB port on the HP laptop. Faulty ports, dust, or loose connections can stop the system from detecting the drive properly, especially during early boot. Front ports on docks or hubs can also cause detection issues.
Fix:
Plug the USB directly into a main port on the laptop, not a hub.
Try another USB port (left vs right side, USB 2.0 vs USB 3.0).
Check for visible dust or damage and clean gently if needed.
If the USB appears in one port but not another, it usually means the original port has a hardware or contact issue.
Quick Fix Checklist (Step-by-Step)
When USB not showing in boot menu on HP laptop, go through this order:
- Recreate bootable USB with Windows Media Creation Tool or Rufus.
- Match mode and file system: UEFI + GPT + FAT32 for most Windows 10 / 11 installs.
- Disable Secure Boot temporarily if using custom or older tools.
- Check BIOS settings for USB boot enabled and correct UEFI / Legacy support.
- Try different USB ports and, if needed, a different USB drive.
- Update BIOS from HP’s support site if the laptop is very old or has known boot issues.
If the system does boot from USB but then shows strange graphics problems, lines, or crashes afterward, the issue may move from boot to display or driver level. In such cases, a detailed guide like Black Line on Laptop Screen HP can help you diagnose screen‑related problems step by step after the OS is running.
How to Create a Bootable USB for HP Laptop
To boot from USB HP laptop the right way, the USB must be made as a real bootable drive, not just a normal pen drive with files copied into it. This is the step many people miss, and then the USB never shows in the HP laptop boot menu key screen. In simple words, a good bootable USB is the bridge between your laptop and the Windows setup or recovery tool. Once this part is done well, the rest feels much easier.
Option 1: Using Windows Media Creation Tool
For most people, this is the easiest and safest method. If the goal is HP boot from USB Windows 10/11, the official Windows Media Creation Tool is usually the best choice because Microsoft builds it for this exact job. It feels a bit like using the main road instead of a shortcut through small lanes. There are fewer surprises, and the USB usually works well on modern HP laptops.
First, download the Windows Media Creation Tool from the official Microsoft website on a working computer. Then plug in a USB drive with at least 8 GB of space, though 16 GB is better. Keep in mind that this process erases everything on the USB, so move any important files before you start.
Open the tool and accept the license terms. Select Create installation media for another PC, then choose the correct language, Windows edition, and system type if needed. After that, pick USB flash drive when the tool asks where to put Windows. The tool will download the files, prepare the USB, and make it bootable on its own.
When it finishes, safely remove the USB and test it on the HP laptop. If the USB was made correctly, it should appear when you press the HP laptop boot menu key and open Boot Device Options. For users asking how to boot HP laptop from USB, this method is often the smoothest start.
Option 2: Using Rufus
Rufus is the better choice when you want more control. It is very useful for older Windows versions, Linux, recovery tools, or when you need to choose between UEFI and Legacy mode by hand. In repair work, Rufus is often the tool that saves the day when the official method does not fit the job. It is small, fast, and very flexible.
Start by downloading Rufus from its official site. Then plug in the USB drive and open Rufus. At the top, choose your USB device, then click Select and load the ISO file you want to use. This ISO can be Windows, Linux, or another bootable recovery tool.
Now choose the right settings before pressing Start. For most modern HP laptops, select GPT as the partition scheme and UEFI as the target system. Then choose FAT32 if available, because many HP systems read FAT32 more smoothly during startup. After that, click Start and wait for Rufus to build the bootable USB.
Rufus may show a few extra prompts during the process, and that is normal. Read them carefully and continue with the default option unless you have a special reason to change it. When the job is done, the USB is ready for boot from USB HP laptop on Windows 10 or 11, and often for Linux as well.
Best Format Settings (GPT/UEFI Recommended)
For most newer HP laptops, the best format setting is GPT + UEFI. This is the modern setup and it matches how most Windows 10 and Windows 11 systems are built. If your laptop is fairly recent, this is the safest road to take. In many cases, it also works better with Secure Boot.
A simple setup to remember is this: use GPT for modern UEFI systems, and use MBR only for older HP laptops that need Legacy support. For file system, FAT32 is usually the best first choice because it has the best compatibility in the boot menu. If a file is too large and Rufus switches to NTFS, the USB may still work, but some HP laptops with Secure Boot enabled may not detect it as easily.
So the easy rule is this: for HP boot from USB Windows 10/11, use GPT + UEFI + FAT32 whenever possible. For very old models, use MBR + Legacy only if the laptop does not support UEFI properly. This small setting choice can decide whether the USB appears instantly in the boot menu or wastes an hour of your time.
One small tip from real repair work: after making the USB, do not wait for a crisis to test it. Plug it into the HP laptop, open the boot menu, and check if the drive appears. That one-minute test can save a lot of stress later, especially when the laptop stops working and you need a fix fast.
Boot from USB for HP Laptop Without BIOS (Advanced Trick)
Yes, you can boot from USB HP laptop without opening BIOS by hand, as long as Windows still starts normally. This method uses Windows Advanced Startup, which feels like taking a side door instead of the main gate. It is a very helpful trick when the HP laptop boot menu key is hard to catch or you just want a calmer way to do it.
On Windows 10 and 11, go to Settings, then open Recovery, and find Advanced Startup. On some systems, Windows 10 shows this under Update & Security > Recovery, while Windows 11 shows it under System > Recovery. Once you click Restart now, the laptop opens a blue recovery screen with more startup choices.
From that blue screen, choose Use a Device. This option tells the laptop to start from another device, such as a bootable USB drive, instead of the normal Windows drive. When the USB is made correctly, this is one of the easiest ways for HP boot from USB Windows 10/11 without changing the full BIOS setup.
Here is the simple path to follow:
- Plug the bootable USB into the HP laptop.
- Open Settings > Recovery > Advanced Startup.
- Click Restart now.
- On the blue screen, choose Use a Device.
- Select the USB drive from the list.
- Wait for the laptop to restart and load from the USB.
This method is great for people who ask, can I boot my HP laptop from USB without changing BIOS? Yes, in many cases you can, and this is the cleanest way. But there is one catch: if Windows does not open at all, this trick will not help, and the safer path is the normal startup method with Esc, F9, or BIOS settings.
In real use, this method saves time and stress, especially for beginners. There is no rush to tap keys at the right second, and that alone makes it feel much easier. So for anyone learning how to boot HP laptop from USB, Windows Advanced Startup is a smart backup method to keep in mind.
Boot from USB After Replacing Hard Drive
Yes, you can boot from USB HP laptop after replacing the hard drive or SSD. In fact, this is often the next step, because a new drive is usually empty and has no Windows on it. So if you just upgraded storage and now ask how to boot HP laptop from USB, this is the right path.
Important for SSD upgrade users
This part is very important for SSD upgrade users. A new SSD is fast, but it is like a new house with no furniture inside, so the laptop needs a bootable USB to install Windows 10 or 11. That is why HP boot from USB Windows 10/11 is so useful after a storage upgrade.
Most HP laptops can do this without much trouble if the drive is fitted well and the USB is made the right way. Start the laptop, press the HP laptop boot menu key with Esc, then press F9 to open Boot Device Options. From there, you can choose the USB and begin setup on the new drive.
Steps after installing new HDD/SSD
After the new HDD or SSD is installed, first make sure it is seated properly inside the laptop. Then plug in the bootable USB drive before turning the laptop on. This helps the system detect both the new drive and the USB from the start.
Next, turn on the HP laptop and press Esc again and again until the Startup Menu appears. Then press F9 and select the USB drive from the list. Once you press Enter, the laptop should start from the USB and load the Windows setup or recovery tool.
If you need help opening the laptop, removing the old drive, or checking the fit after the upgrade, read How to Remove Hard Drive from HP Laptop. That guide is very useful when the system does not detect the drive properly after replacement. Once the drive is installed well, boot from USB HP laptop becomes much easier and more reliable.
Boot from USB After Removing Battery
Boot from USB HP laptop can still work fine after removing the battery, but the laptop may behave a little differently at first. Sometimes, after a battery change or deep discharge, the system forgets some power and BIOS settings for a short time. This is why the laptop may take longer to start or show a date and time reset before you reach the boot menu. With a small power reset and a quick check, you can still boot from USB without much trouble.
Power reset method
The power reset method helps clear any stuck power state that stops the laptop from turning on or detecting devices like a USB. It is very simple and safe if done step by step. Many times, a laptop that refuses to boot or hangs on a black screen starts working again after this small reset.
Follow these steps:
- Turn off the HP laptop completely.
- Remove the battery (for models with a removable battery) and unplug the charger.
- Press and hold the power button for 15–20 seconds to drain leftover power.
- Reconnect the charger only, leave the battery out for now.
- Plug in the bootable USB drive.
- Turn on the laptop, press Esc repeatedly, then press F9 and select the USB.
If the laptop boots from USB now, the power reset method did its job. You can shut down later, put the battery back in, and test again. For built‑in batteries, there is often a small pin‑hole reset or a key combo instead, which is usually shown in the HP manual.
CMOS reset basics
In some HP laptops, removing the main battery or doing a deeper reset can also affect CMOS settings. CMOS is the small memory that stores BIOS options, time, and date. When it resets, some boot settings may return to default, which can change how the laptop handles USB boot.
After a CMOS‑style reset, check these points if you want to boot from USB HP laptop again:
- Enter BIOS Setup with Esc → F10 and confirm that USB boot is enabled.
- Check that UEFI / Legacy settings still match your USB type.
- Set the correct time and date, which helps some security features work properly.
If you are not sure how to safely remove or refit the battery on your model, it is better to follow a clear guide. For that part, read How to Remove Battery from HP Laptop (Step-by-Step Guide for All Models) so the battery work does not damage the connectors or casing. Once the power and CMOS resets are done correctly, boot from USB HP laptop usually works again just like before the battery was removed.
FAQ
Can I boot my HP laptop from USB without changing BIOS?
Yes, in many cases you can boot your HP laptop from USB without changing BIOS settings. The easiest way is to use Windows Advanced Startup and the Use a device option, or use the HP laptop boot menu key (Esc → F9) for a one‑time boot. Both methods let you start from a bootable USB without saving any permanent changes to the boot order. If Windows will not start at all, then the boot menu or BIOS route is still needed.
Why is my HP laptop not booting from USB?
Most of the time, an HP laptop is not booting from USB because the USB is not truly bootable, the file system or partition style is wrong, or Secure Boot is blocking it. Sometimes the USB port or the drive itself is faulty, which stops it from showing in the boot menu. Recreating the USB with tools like Windows Media Creation Tool or Rufus, matching UEFI/Legacy settings, and checking Secure Boot usually fixes the problem.
What is the HP laptop boot menu key?
On most HP laptops, the boot menu key is a small combination: press Esc repeatedly right after powering on to open the Startup Menu, then press F9 for Boot Device Options. This menu shows all devices the laptop can boot from, including a bootable USB drive. You can pick the USB here for a one‑time boot from USB HP laptop without touching the main BIOS boot order.
Does Secure Boot need to be disabled?
Secure Boot does not always need to be disabled, but sometimes it does, depending on how the USB was created. For a standard HP boot from USB Windows 10/11 made with the official Microsoft tool, Secure Boot usually works fine. If you use older ISOs, Linux, or custom tools, Secure Boot may block them, so disabling it in BIOS (Esc → F10 → Secure Boot → Disabled) can be required. After finishing your work, turning Secure Boot back on is a good idea for better day‑to‑day security.
How do I enable USB boot in HP BIOS?
To enable USB boot in HP BIOS, start the laptop and press Esc repeatedly, then press F10 to open BIOS Setup. Go to System Configuration or Boot Options and look for settings like USB Boot, USB Storage Boot, or External Device Boot and set them to Enabled. While you are there, make sure the boot order allows USB (and that UEFI or Legacy mode matches your USB), then Save and Exit so the laptop can boot from USB when you need it.
Conclusion
boot from USB HP laptop is not a risky, expert‑only job; it is simply a small set of clear steps done in the right order. Once a proper bootable USB is ready, BIOS or UEFI is set correctly, and the HP laptop boot menu key is known, you can reinstall Windows, repair problems, or test other tools without fear. Always handle BIOS settings slowly and carefully, write down any change you make, and avoid random options you do not understand. When this calm, step‑by‑step habit is followed, the laptop feels less like a mystery box and more like a device you can control and fix on your own.